3D Printing
🖳3D Printing🖳
3D Printing entry
For this entry, we were tasked with designing in Fusion 360 and 3D printing an object that cannot be made subtractively. The term subtractive manufacturing refers to a process which 3D objects are constructed successively cutting material away from a solid block of material. Hence, i decided to craft a tesseract as my 3D printed object. Here is an example of a tesseract.

To design this tesseract, i used Fusion 360 as well as a Video Guide that i found on YouTube.
Design Steps
Step 1: Create sketch and press top plane
 \
\Step 2: Click on center rectangle under create and form a rectangle 15x15mm

Step 3: Extrude sketch by 15mm

Step 4: Create new sketch on top plane of the cube and offset the edge by -2.5mm

Step 5: Repeat step 4 for every side of the cube.

Step 6: Extrude each small box by -15mm

Step 7: Under the modify tab, use the chamfer tool and select the inner side of the square.

Step 8: Repeat step 7 for all side of the cube.
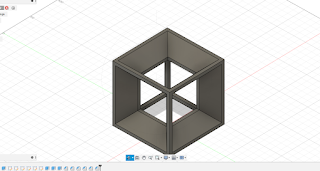
Step 9: Extrude out edges of the cube by -10cm as seen below.

Step 10: Repeat step 9 for every side of the cube and obtain the final product.

Final Product:
STL File: Link
3D Printed Tesseract:

Hero Shot:

Reflection:
Overall, 3D printing has been a fun and interesting experience, Getting to create and 3D printing something designed from scratch is a unique experience that i hope to do again. Watching the 3D printer print layer by layer was satisfying as you can see the progress of the 3D printed object. Learning 3D printing is a valuable skill which will be helpful for future projects.
Comments
Post a Comment