💻Arduino Programming💻

 💻Arduino Programming💻 

Introduction to Arduino (8/11/21)

In this lesson, we are introduced to Arduino Programming and given a series of introductory activities and challenges to test our understanding of Arduino programming.

Activity 1

For our very first activity, we were tasked to make a code to control the lights on the Arduino board "blink". 

To do this activity, I did the following steps:

    Step 1: Launch the Arduino programming software

Step 2: Under the file tab, click onto Example-> Basics-> Blink and the Blink code should be seen
Step 3: Click on the Upload button at the top and the program will be uploaded onto the Arduino board.

Challenge for activity 1: Add a delay onto the code above such that the designated light will remain on for 5s and off for 3s

To accomplish this, I tweaked my code as seen below:
void setup() { 

  // initialize digital pin 5 as an output. 

  pinMode(5, OUTPUT); 

} 


// the loop function runs over and over again forever 

void loop() { 

  digitalWrite(5, HIGH);   // turn the LED on (HIGH is the voltage level) 

  delay(5000);                       // wait for 5 second 

  digitalWrite(5, LOW);    // turn the LED off by making the voltage LOW 

  delay(3000);                       // wait for 3 second 

} 

 Video Link: https://youtu.be/y8RNvsiy3TM


Activity 2:


In our second activity, we were tasked to program the Arduino board such that we could control the lights on the Arduino board with a button also located on the Arduino board.


To perform this activities, here are the steps I did:

Step 1: Launch the Arduino programming software


Step 2: Under the file tab, click onto Example-> Digital->DigitalInputPullup and the  code should be seen

Step 3: Click on the Upload button at the top and the program will be uploaded onto the Arduino board.

Challenge for activity 2: Program light source Pin 13 to blink 5 times with the press of a button on the Arduino board

To do this challenged, i had to change my code as seen below:

void setup() { 

  //start serial connection 

  Serial.begin(9600); 

  //configure pin 2 as an input and enable the internal pull-up resistor 

  pinMode(2, INPUT_PULLUP); 

  pinMode(13, OUTPUT); 


} 


void loop() { 

  //read the pushbutton value into a variable 

  int sensorVal = digitalRead(2); 

  //print out the value of the pushbutton 

  Serial.println(sensorVal); 


  // Keep in mind the pull-up means the pushbutton's logic is inverted. It goes 

  // HIGH when it's open, and LOW when it's pressed. Turn on pin 13 when the 

  // button's pressed, and off when it's not: 

  if (sensorVal == HIGH) { 


    digitalWrite(13, LOW); 

  } else { 

    for (int i=0; i < 5; i++) 

    { 

    //ON PIN13 FOR 5 MS AND OFF FOR 5MS 

      digitalWrite(13, HIGH); 

      delay(500); 

      digitalWrite(13, LOW); 

      delay(500); 


    } 

  }}

Demonstration: https://youtu.be/f18bkqVo8BE

Activity 3:

The third activity we were assigned was to play a music tune when the code is launched into the Arduino board.

To perform this task, these are the following steps I did:
Step 1: Launch the Arduino programming software
Step 2: Under the file tab, click onto Example-> Digital->ToneMelody and the code should be seen

Step 3: Click on the Upload button at the top and the program will be uploaded onto the Arduino board.

Challenge for activity 3: Program the Arduino board such that the music tone would be played when the button on the Arduino board is pressed.

To perform the challenge, i had to alter some of my code as seen below:

#include "pitches.h"  


// notes in the melody:  


int melody[] = {  


  NOTE_C4, NOTE_G3, NOTE_G3, NOTE_A3, NOTE_G3, 0, NOTE_B3, NOTE_C4  


};  


// note durations: 4 = quarter note, 8 = eighth note, etc.:  


int noteDurations[] = {  


  4, 8, 8, 4, 4, 4, 4, 4  


};  


void setup() {  


  //start serial connection  


  Serial.begin(9600);  


  //configure pin 2 as an input and enable the internal pull-up resistor  


  pinMode(2, INPUT_PULLUP);  


  pinMode(13, OUTPUT);  


void loop() {  


  //read the pushbutton value into a variable  


  int sensorVal = digitalRead(2);  


  //print out the value of the pushbutton  


  Serial.println(sensorVal);  


  // Keep in mind the pull-up means the pushbutton's logic is inverted. It goes  


  // HIGH when it's open, and LOW when it's pressed. Turn on pin 13 when the  


  // button's pressed, and off when it's not:  


  if (sensorVal == HIGH) {  


digitalWrite(13, LOW);  

noTone(8);  

    //DO NOTHING!  


  } else {  


digitalWrite(13, HIGH);  


    //PLAY TONE!  


  }  


  // iterate over the notes of the melody:  


  for (int thisNote = 0; thisNote < 8; thisNote++) {  


    // to calculate the note duration, take one second divided by the note type.  


    //e.g. quarter note = 1000 / 4, eighth note = 1000/8, etc.  


    int noteDuration = 1000 / noteDurations[thisNote];  


    tone(8, melody[thisNote], noteDuration);  


    // to distinguish the notes, set a minimum time between them.  


    // the note's duration + 30% seems to work well:  


    int pauseBetweenNotes = noteDuration * 1.30;  


    delay(pauseBetweenNotes);  


    // stop the tone playing:  


    noTone(8);  


  }  


}

Activity 4: 

The fourth activity we were assigned is to control a servo motor using an Arduino board to rotate the servo arm.

To accomplish this task, i did the following steps:

Step 1: Launch the Arduino programming software
Step 2: Under the file tab, click onto Example-> Servo->Sweep and the code should be seen

Step 3: Click on the Upload button at the top and the program will be uploaded onto the Arduino board.

Challenge for activity 4: program a code to control the servo arm to start at 20 degrees and rotate slowly to 150 degrees before returning to 20 degree and rapidly rotating to 150 degree again.

To do this challenge, i had to make some changes to my code:

#include <Servo.h> 


Servo myservo;  // create servo object to control a servo 

// twelve servo objects can be created on most boards 


int pos = 0;    // variable to store the servo position 


void setup() { 

  myservo.attach(9);  // attaches the servo on pin 9 to the servo object 

} 


void loop() { 

  for (pos = 20; pos <= 150; pos += 1) { // goes from 0 degrees to 180 degrees 

    // in steps of 1 degree 

    myservo.write(pos);              // tell servo to go to position in variable 'pos' 

    delay(3000);                       // waits 15ms for the servo to reach the position 

  } 

  for (pos = 150; pos >= 20; pos -= 1) { // goes from 180 degrees to 0 degrees 

    myservo.write(pos);              // tell servo to go to position in variable 'pos' 

    delay(3000);                       // waits 15ms for the servo to reach the position 

  } 

  for (pos = 20; pos >= 150; pos -= 1) { // goes from 180 degrees to 0 degrees 

    myservo.write(pos);              // tell servo to go to position in variable 'pos' 

    delay(15);                       // waits 15ms for the servo to reach the position 


}}


And with that, that concludes our first lesson with Arduino Programming.


Arduino Practical 
In this practical, we were given the task of automating a lasercut unicorn!
In order to achieve this task, we had to rely on the skills and codes we learned earlier to program the Laser cut unicorn!

To begin off, the class was asked to write a code with the aim of flapping the wings of the unicorn and if possible, add another feature that can be programmed with the Arduino board.
For our code, we used a simple sweep example code. When powered, our servo would sweep towards the left in steps of 10 degrees all in the timespan of 25 milliseconds. 
Next, it would sweep back to its starting position of 10 degrees in steps of 10 degrees with 15 milliseconds.
Here's a picture of our code:


Here's an example of our code in action

Arduino Individual task
1: Input device
a) Interface a potentiometer analog input to Maker UNO board and measure its signal in serial number monitor Arduino IDE.
Potentiometer analog guide
Tinkercad Set Up:


Tinkercad Code:


Demonstration of code:


b) Interface a LDR to maker UNO board and measure its signal in serial monitor Arduino ITE
Photoresistor Guide:
Tinkercad set up:
Tinkercad Code:
Demonstration:


2. Output devices
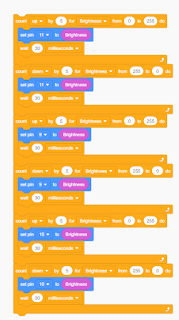
a) Interface 3 Leds (Red, Yellow, Green) to maker UNO board and program it to perform something (fade or flash etc)
YouTube Guide:

Tinkercad Setup:

Tinkercad Code:

Demonstration:
Tinkercad LED fa
de code

b) Interface the Dc motor to maker UNO board and program it to go on and off using push button on the board.


Tinkercad Setup:

Tinkercad Code:

Demonstration:


What i learned?
Through this practical of Arduino programming, I realized that input devices are mainly comprised of devices and sensors whereas output device is more for the LED lights, audio and motors.  I
learned that interfacing input device to Arduino Board will allow us to collect the data that
we need from the input device to the Arduino Board itself and these data would then be fed
into an output device through the Arduino Board, which will then react according to the
data given by the input device.
For example, the input device could be an photoresistor sensor and the output device can be a LED light. When the input device collects the relevant data, it would then be fed to the
output device which is the LED lights. The data from the input device would be converted to a signal
for the LED light to carry out an action, this action can be turning on/off the LED light
depending on the data that was being fed into it.

Problems Faced 
One problem that i faced while doing this task was that i would occasionally mix up the wiring of the ground and 5v which would cause the entire program to fail. Additionally, I had some trouble programming the simulation using block feature since i am more used to text programming.

Reflection 

After learning the basics of coding from the tutorial and practical, I gained a deeper appreciation to the programmers out there since I realize that programming is frustrating and patience is required since the code might not work all the time. Despite the frustration in programming throughout the tutorial and practical, I will admit that programming can be fun when trying to modify the simple codes to see what it does to the Arduino board but it can be really frustrating at times when the code doesn't go according to plan.
Additionally, Tinkercad is a great program for Arduino since it is an online software that does not require us to physically have the Arduino kit.


Comments